¶ Tag Mapper
Sensors are referred to as Tags across the Platform. There can be a wide variety of Sensors used in a plant. There could be heat sensors, pressure sensors, voltage, frequency, vibration, speed, load, pressure deviation, and so on. Each sensor in the plant is given a unique identifier called "dataTagId" along with information such as instrument properties, its location in the plant, the property it measures, etc. All this information is added to a record called "tag meta" in the Database.
Let us, at the outset, know the hierarchical asset structure within a Plant.
Every Plant has a number of systems, for example, Boilers, Cooling systems, Fuel Supply, Generators, Transformers, Turbines, and many more. The system, therefore, is a collection of equipment that performs a specific function. The system is, thus, broken down at the first level into a set of Equipment or Assets.
The equipment/assets are usually self-sufficient machinery that contribute to a specific aspect of a system’s functioning. For example, Preheater is an equipment and is a part of the Boiler system.
Components and/or Sub-Components are the logical breakdown of equipment like Economizers, Main Steam Lines, Supply Systems, Fans, Steam Pressure Controllers, Storage Tanks, Air Coolers, Furnaces and Bearings cases of sub-components, and others.
Relevant Sensors (Tags) are attached to each Component or Sub-Component to record/monitor respective measure properties. The Measure Property is the medium or base property of the system that is being monitored. Depending on the type of plant (Power Generating, Cement), these measure properties could be, Secondary Air, Metal, Power, Main Steam, Feed Water, Cooling Water, Flue Gas, Oxygen, Furnace, and others to measure Differential Pressure, Current, Voltage, Frequency, Flow, Run Hours, Pressure Deviations, etc in terms of respective measure units like KG/Cm2, Kv, Mm/Sec, Tph, Hours, MTs, RPM, Kj/Kg, kW, Kva etc (measure types).
The Tag Mapper feature of Pulse Platform allows users to map or assign the Sensors (Tags) to Equipment/Assets, Components, and/or Sub-Components, Measure Property, Measure Type, Measure Units, and Measure Location (the location at which the sensor is placed). For example, Inlet, Outlet, etc. all these sensors when onboarded remain Unassigned until you assign them to the relevant System, Equipment/Asset, Component, or Sub-Component.
Warning: Do not attempt to assign the Sensors unless you are well-versed with the Systems/Equipment/Assets and their measuring parameters. Assigning incorrect information will result in irrelevant tagmeta.
¶ 1. How to add tags through Tag Mapper
Use the link below to go to tag mapper page of Pulse
https://data.exactspace.co/pulse-tag-mapper-ng/#/tagmapper
or
Enter the URL https://data.exactspace.co/pulse-login/
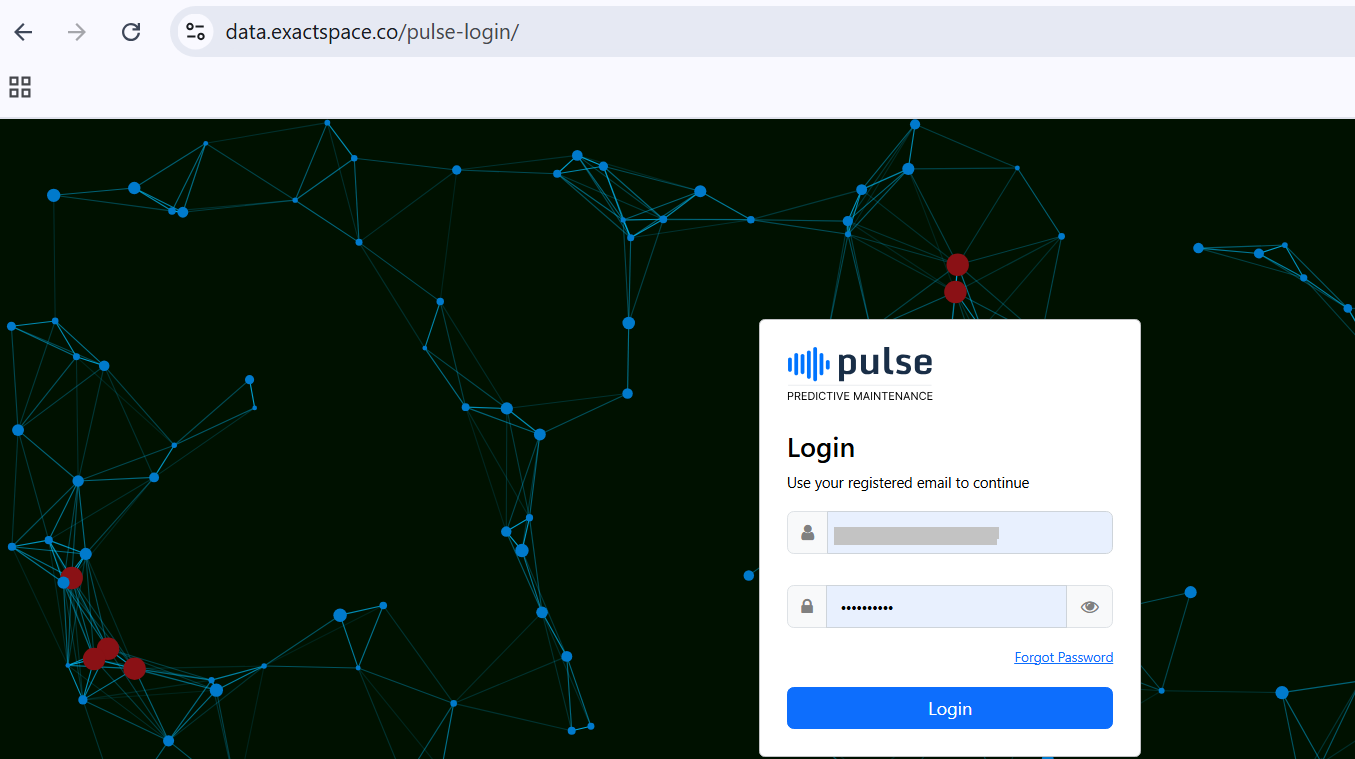
- Enter username and password and login
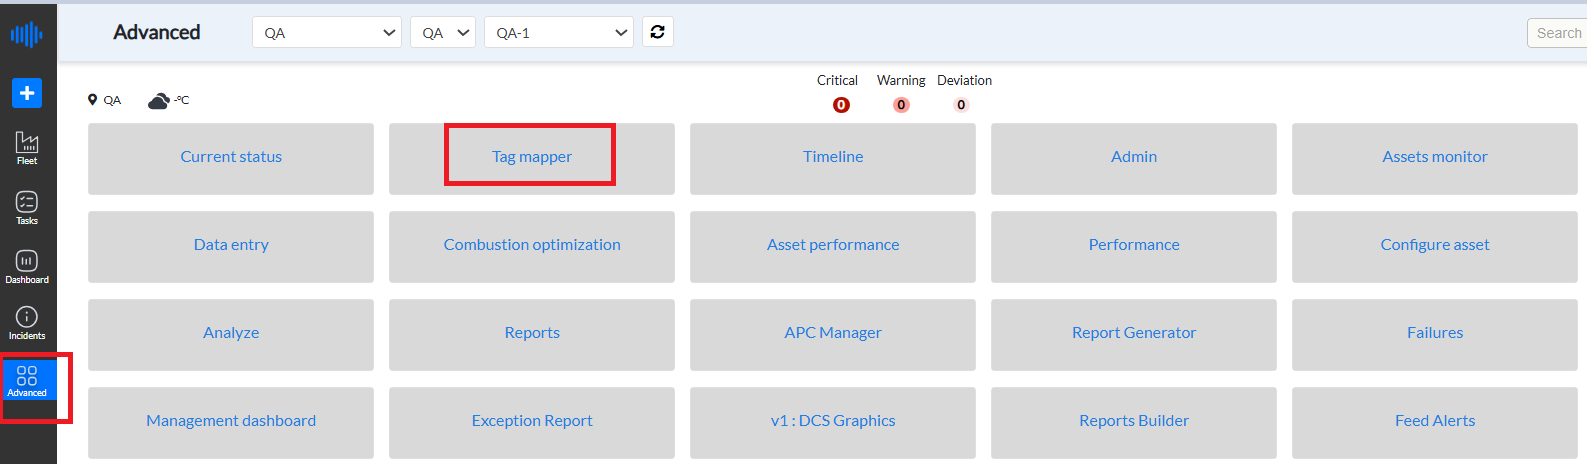
- Click on Advanced
- Click on Tag Mapper
Within the Tag Mapper interface, you'll find a list of tags categorized into two sections: "Assigned" and "Unassigned." Your task involves assigning equipment with the appropriate tags by navigating through various fields. Initially, the Equipment section will be selected by default. Proceed to assign further fields such as Components, Subcomponents, Measure Property, Measure Type, Measure Unit, Measure Location, Bad Direction, and Anomaly by selecting each tag individually. Components and subcomponents may or may not be assigned for certain tags, but it's essential to assign the remaining properties for comprehensive metadata organization.
There's a common option for all fields labeled "Select All" and "Unselect All," which function uniformly across the board.
- "Select All": Choose this option to select all tags under a specific field, enabling you to assign them collectively to the selected section on the right side. Click "Assign" to complete the assignment process for all selected tags simultaneously.
- "Unselect All": Opt for this option to deselect all tags under a particular field. This is useful if selecting all tags is unnecessary or if you need to make significant changes.
For example
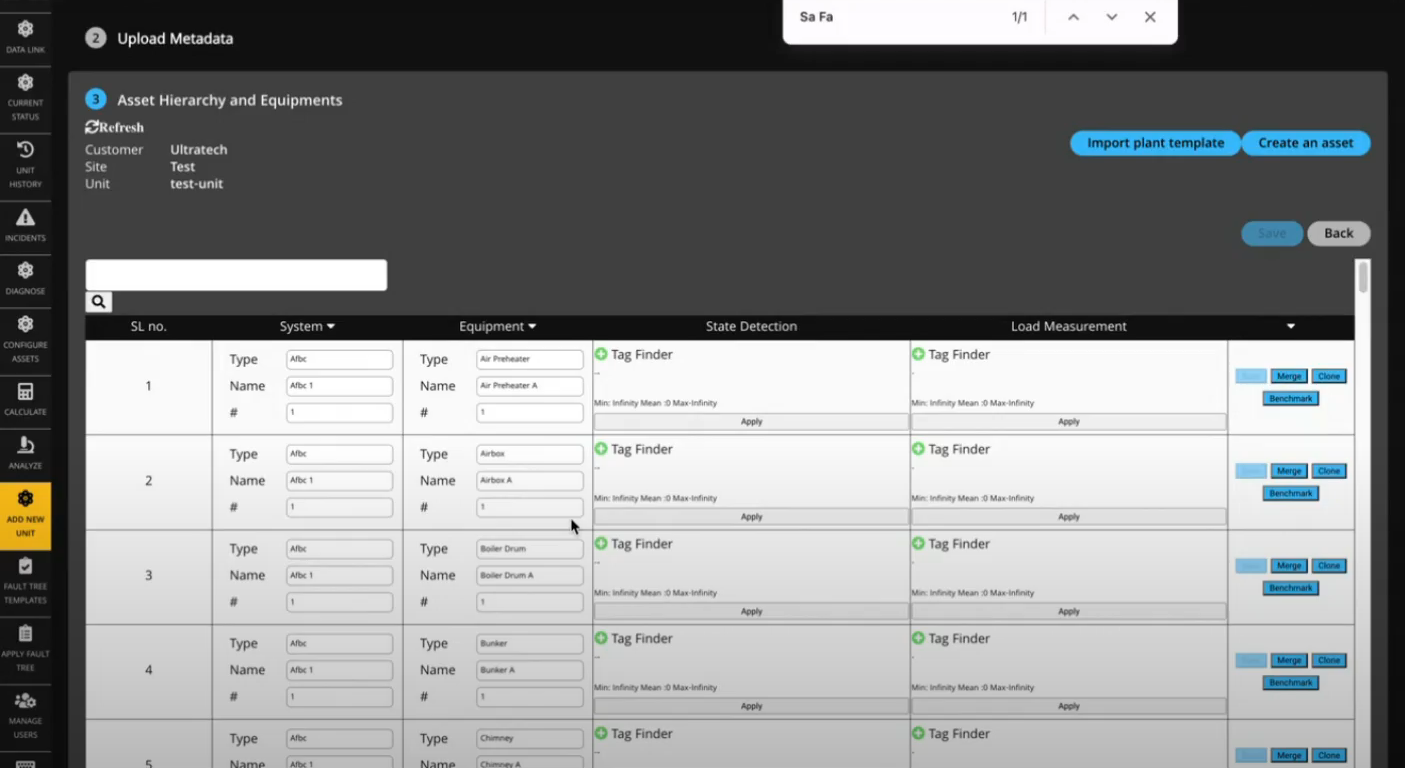
In the figure below, there exists a list of unassigned tags without an accompanying equipment list. Notably, the equipment list is absent, as it is typically accessible through APIs rather than being visually presented. In such instances, queries are directed towards APIs and aren't tied to any specific unit. However, when it comes to assigning equipment to tags, a distinct equipment list becomes essential. This list serves as a reference point for associating equipment with respective tags, ensuring accurate assignment, and facilitating seamless management of equipment-tag relationships.
¶ 1.1 How to add equipment to tags
Upload the system and equipment information in Asset Hierarchy and Equipments by clicking on “Create an asset” or through “Import Plant template” or by “Uploading metadata” through an Excel sheet. Refer to section 2.2.1 to “Create an asset” 2.2.2 for Import plant template and section 2.1 to upload metadata through Excel of this user guide for detailed information on this topic.
- Once the system and equipment is uploaded on Asset Hierarchy and equipment page
- Open tag mapper page for the specific unit you wish to update with the information.
- Click on the refresh button on the top bar, You will get a list of equipment. Now assign equipments to tags

It's important to avoid assigning all tags to the same equipment. Instead, utilize keyword searches to individually assign each tag to the appropriate equipment based on specific requirements.
Note :Ensure you have accurate information regarding the number of equipment units you need to assign tags to, especially when dealing with specific equipment types. For example, you should be aware of whether you have one or two PA fans, enabling you to conduct targeted searches and make appropriate assignments accordingly. This clarity facilitates efficient and precise tagging, optimizing your metadata management process.
Steps to assign equipment to tags -
- Click on the “Equipment” button in the Tag Mapper
- Click on the “Unassigned” button to check unassigned tags and the “Assigned” button to check assigned tags
- Enter the name of the tag under “Tags” that needs to be assigned into the search area of the Equipment section in Tag Mapper.
- Enter either the full name of the tag or a few keywords to search for that tag
- A list of options for the keyword searched will be displayed below.
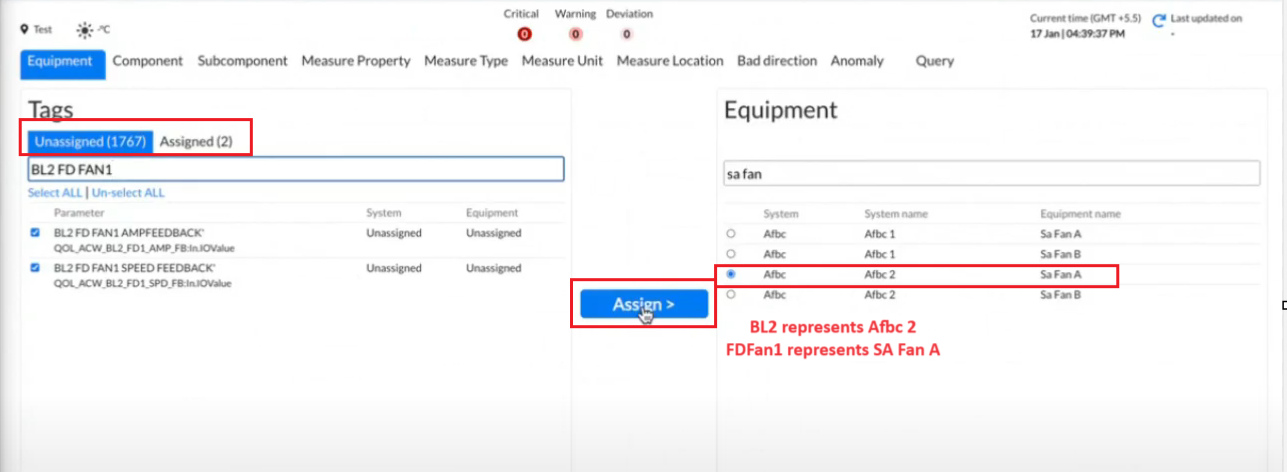
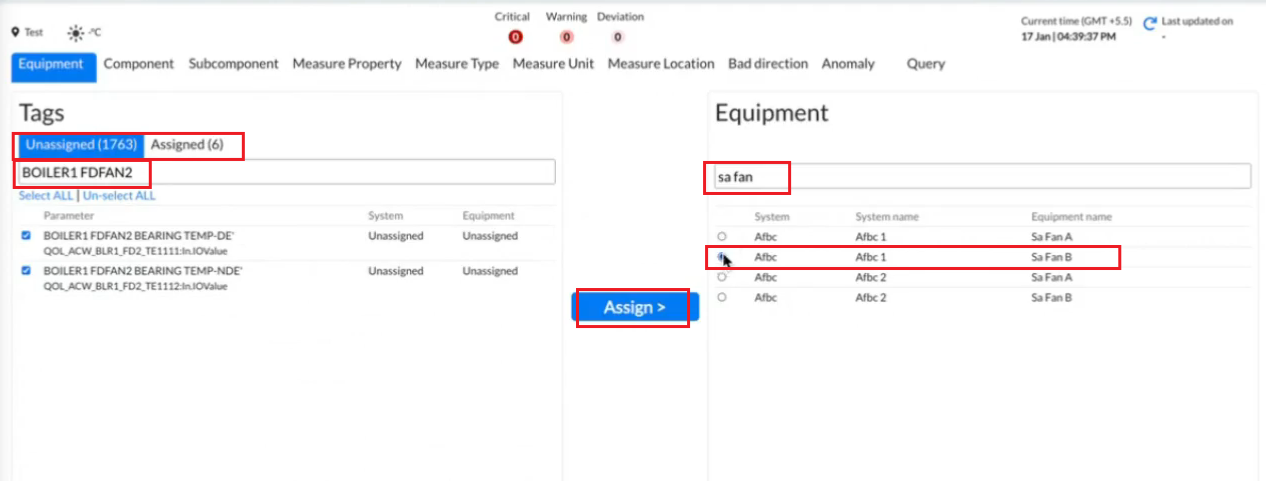
- Search for the tag you want to add an Equipment to. For example, if you search for SA/ FD Fan, search with the proper boiler details it belongs to. If you search for BL2 FD Fan1 it might represent boiler 2 FD Fan 1. Type SA fan in equipment and you get a list of options you can assign that tag to. Relate the most appropriate option
- On the right-hand side search for Equipment under the “Equipment” section search field to the tag.
- Upon selecting a tag on the left side, within a few seconds, the most suitable option for the Equipment that can be assigned to that tag will be automatically highlighted on the right side. This preferred option will be displayed in red color *, providing a clear indication of the recommended Equipment.
- Select one/more tags on the left side while selecting Equipment on the right side
- Click on the “Assign” button
- A message will be displayed “Updating 1 of 1 tags” depending on the number of tags you assign to that Measure Unit.
Note: Occasional delays may occur for display of preferred option on right side for respective fields due to backend service issues, requiring a brief wait for the display. Additionally, it's crucial not to blindly rely on the recommendations; they serve as assistance rather than definitive solutions
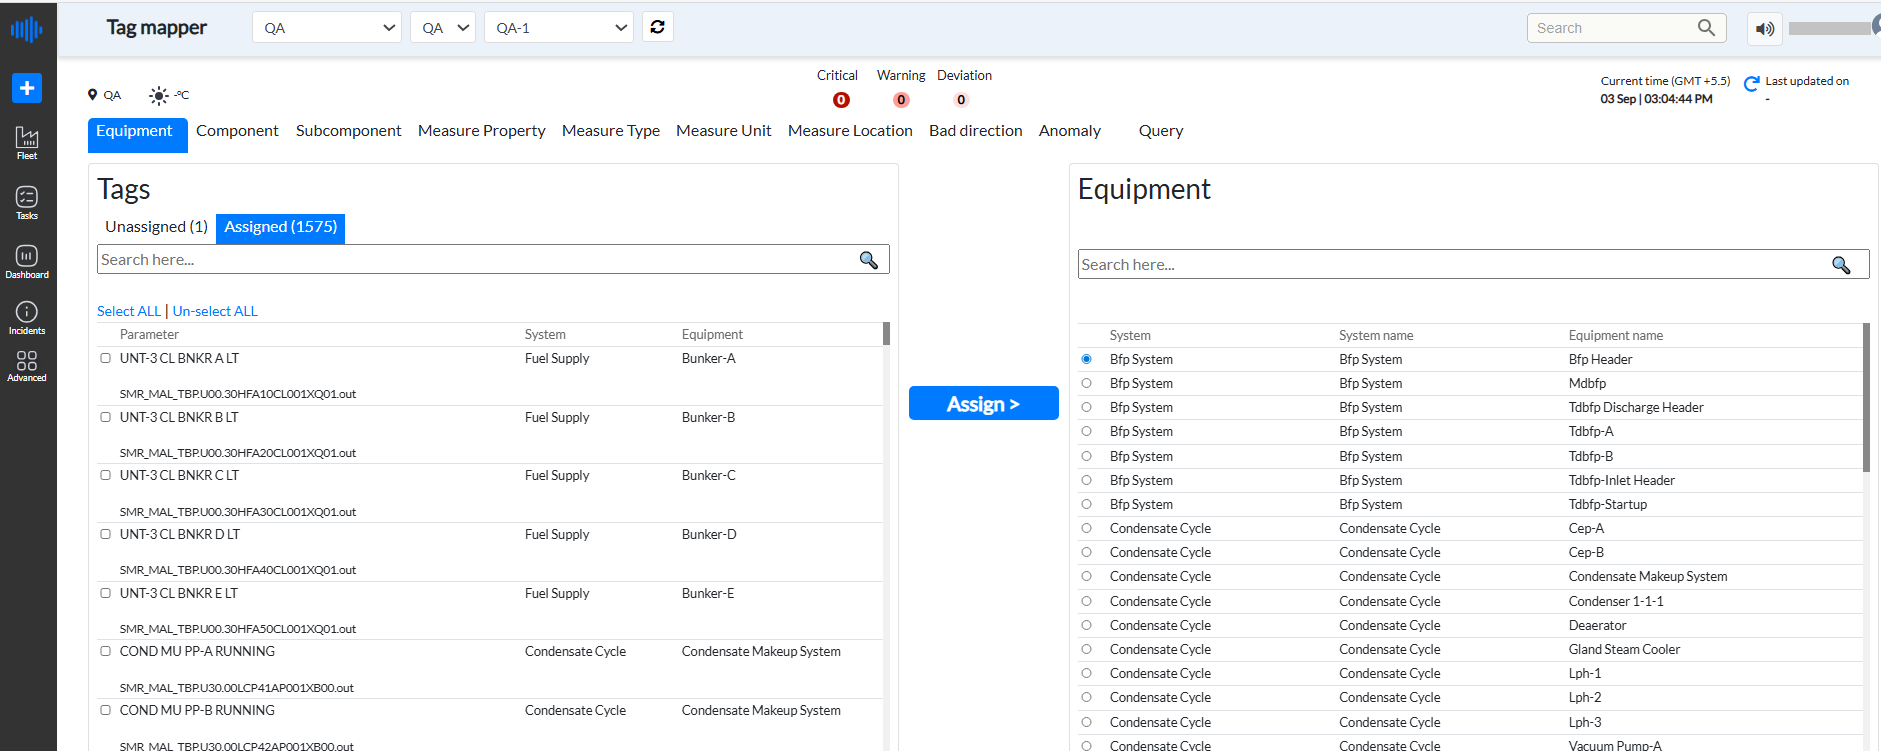
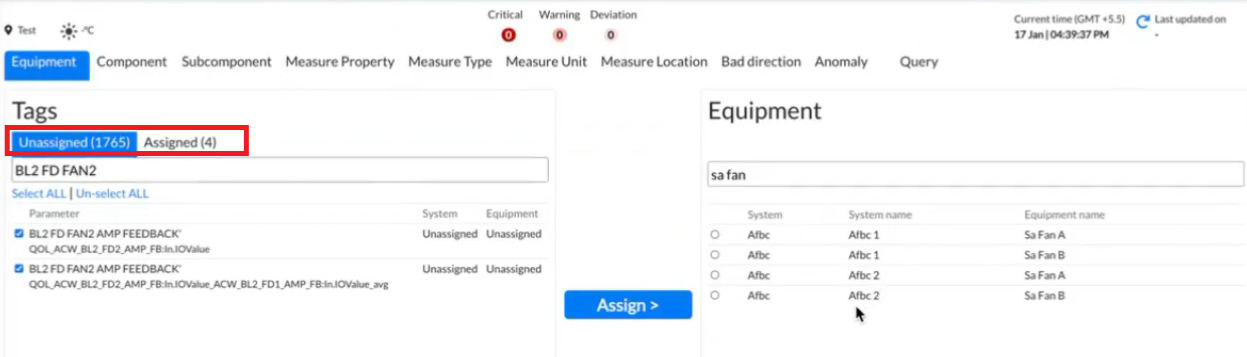
The assigned tags will now be displayed under the "Assigned" section. For example, if the assigned tags previously showed 2, they should now show 4 after the recent assignments have been made.
This change reflects the updated status of tagged equipment, providing a clear indication of the number of assignments made. Please refer to the figure below for visual confirmation.
Similarly Assign other tags
Example for – BL2FDFan2 assign to Afbc2 SA fanB
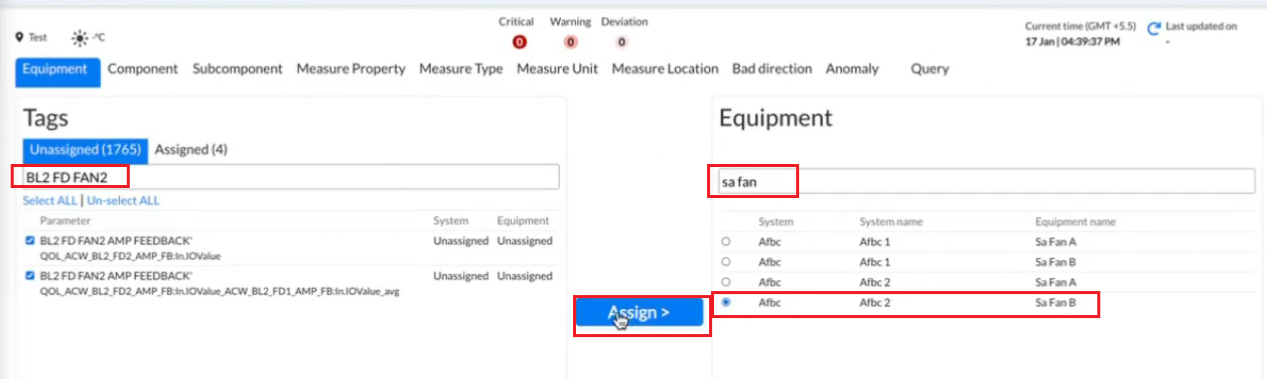
Proceed systematically to assign metadata to the remaining tags
¶ 4.2 How to add components and subcomponents to tags
To add a component to the Tag
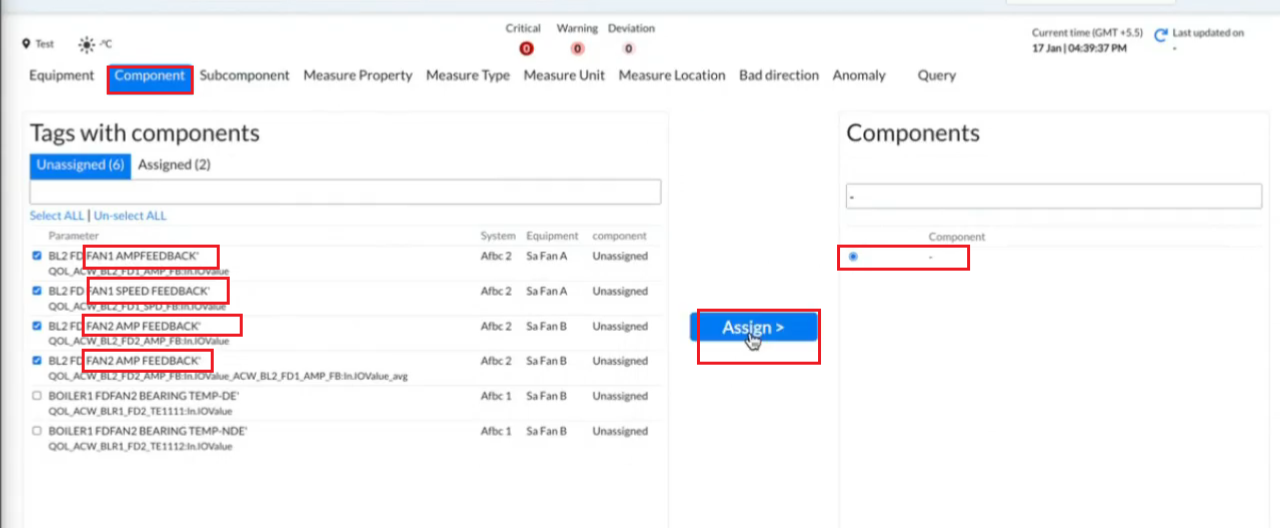
- Click on the Component button in the Tag Mapper
- Click on the “Unassigned” button to check unassigned tags and “Assigned” to check assigned tags
- Search for the tag you want to add a component to. For example Fan
- On the right-hand side search for components under the “Component” section search field with respect to the tag.
- Frequently, upon selecting a tag on the left side, you'll receive the most suitable option for the component that can be assigned to that tag on the right side after a brief delay of a few seconds. It is displayed with red color *
- Select one/more tags on the left side while selecting a component on the right side
- Click on “Assign”
- A message will be displayed “Updating 1 of 1 tags” depending on the number of tags you assign to that component.
- The number of unassigned tags will decrease precisely by the number of tags you have assigned a component to. Simultaneously, the number of tags under the "Assigned" section will increase by the exact number of tags you have assigned a component.
For example:
For the bearing Fan, we assign “motor” as the motor is related to the bearing fan. So select motor on the right side and bearing fan temp on the left side for all those tags you want to assign “motor” as “component”. Click on “Assign”.
Add component “-” to the tag where you do not find any compatible component.
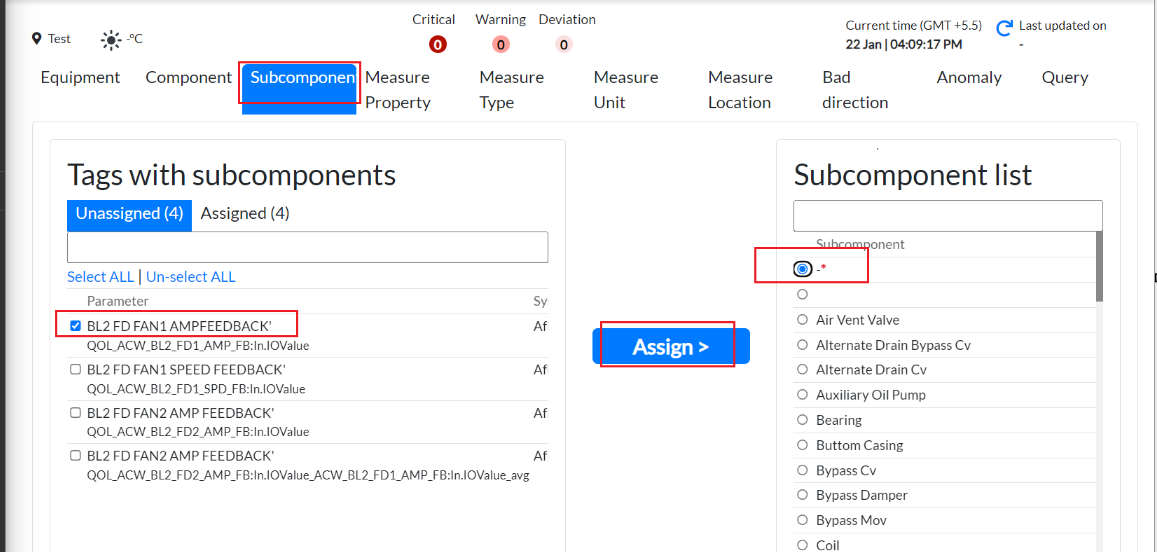
How to add subcomponents to tags
To assign a subcomponent to tags, follow similar steps as mentioned for equipment assignment.
For example, in the case of FAN AMPFeedback, the option of “-” is recommended.
Through tags it's understandable what subcomponent can be assigned to it.
Like
- Bearing temperature -subcomponent- “Bearing”
- Winding temperature-subcomponent- “Winding”
- RPM is related to winding so its subcomponent for it should be “Winding”
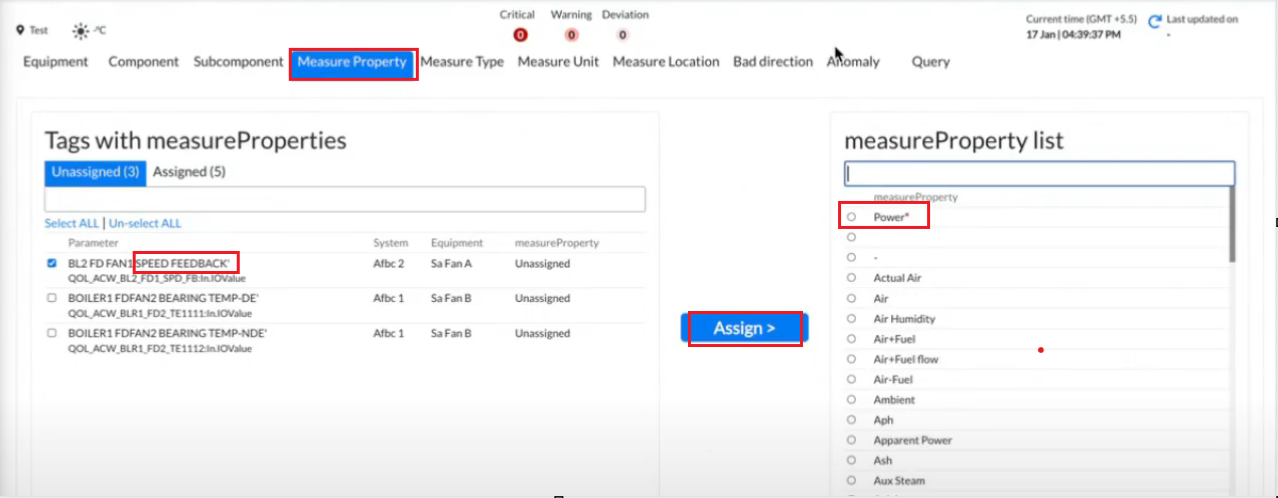
¶ 4.3 How to add Measure Property to tags
Measure property refers to how you measure tags
Steps to add Measure Property to tags
To assign a measure property to tags, follow similar steps as mentioned for equipment assignment.
For example,
To check measure property take some common keyword from the list of assigned tags. Sometimes it's not clear which measure property should be assigned.
For example-
FAN SPEED Feedback can be assigned power. But it has two properties: “rotor speed” or “motor speed”. In such case you can refer the base unit and check the measure property form Configure asset of Pulse interface
How to check “measureProperty” through base unit
Steps-
- Goto Pulse Login
https://cpp.utclconnect.com/pulse-ui-v3/#/login
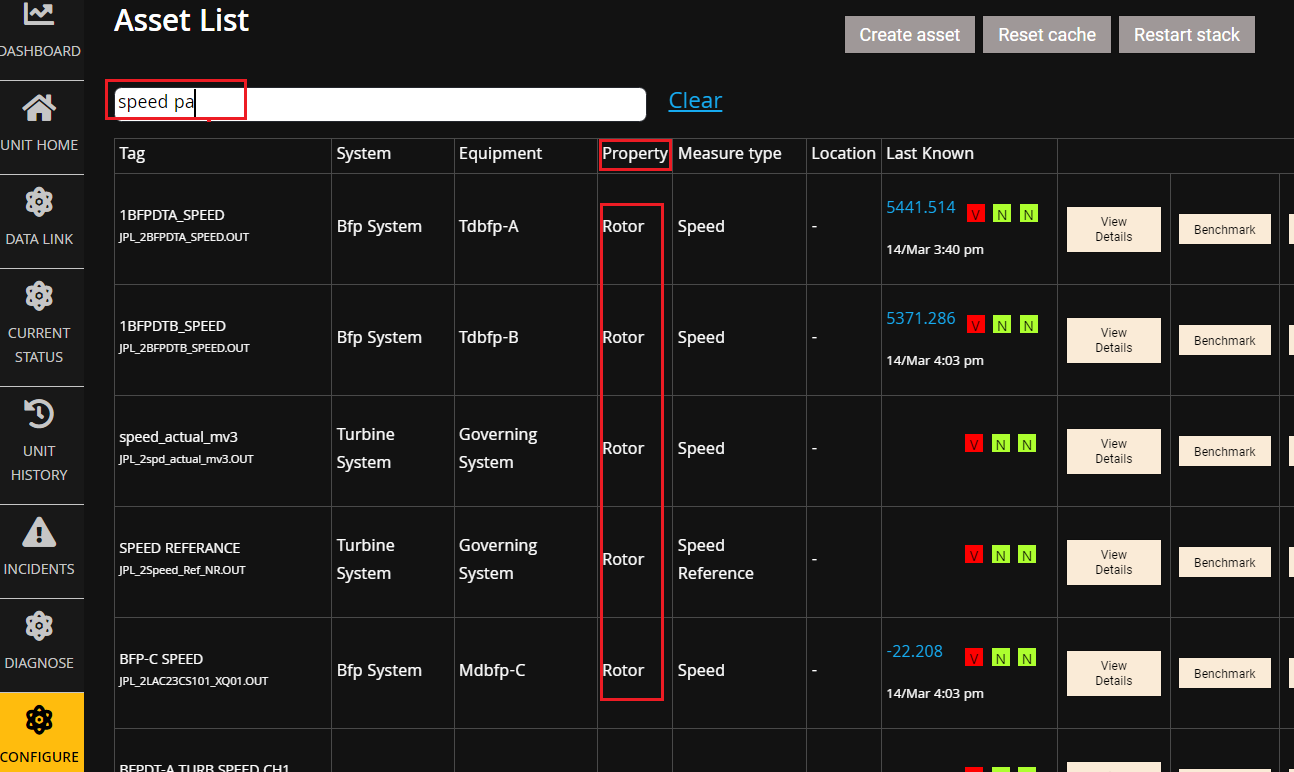
- Click on Configure Asset
- Search for Speed Tag
- Check whether it is Rotor or a motor. Refer the figure below
Another way to check is
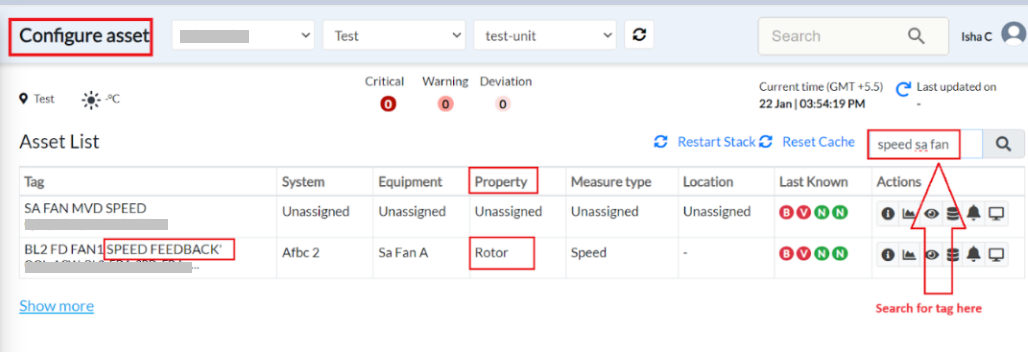
- Go to pulse login https://data.exactspace.co/pulse-login/
- Click on Ops center→ Configure Asset
- Search for the tag on the search placeholder shown on the right hand side. refer to figure below
- Check measure property of the tag
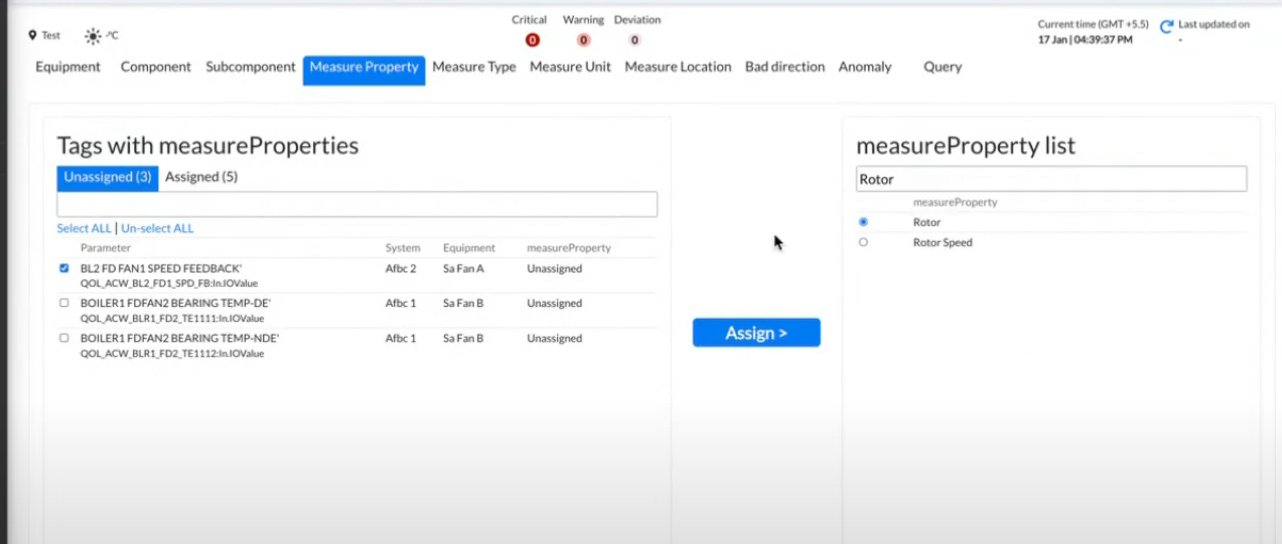
After you check this select rotor for speed feedback tag and click on Assign
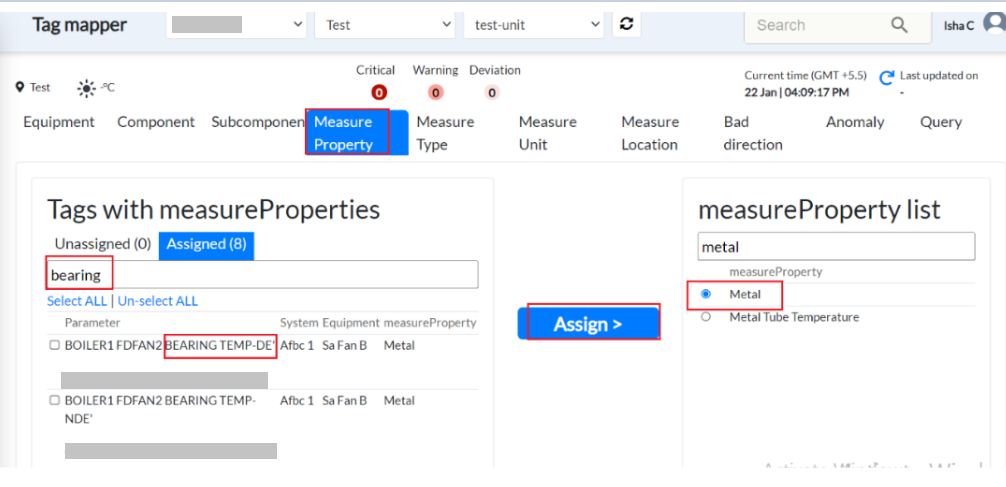
Similarly, if you check for Bearing Temp-DE. Type “bearing’ in Tags with measure properties on the left side. On the right side, you get the option of metal which is its measure property. Select all bearing temperatures you want to assign metal as a measure property. Click on “Assign”
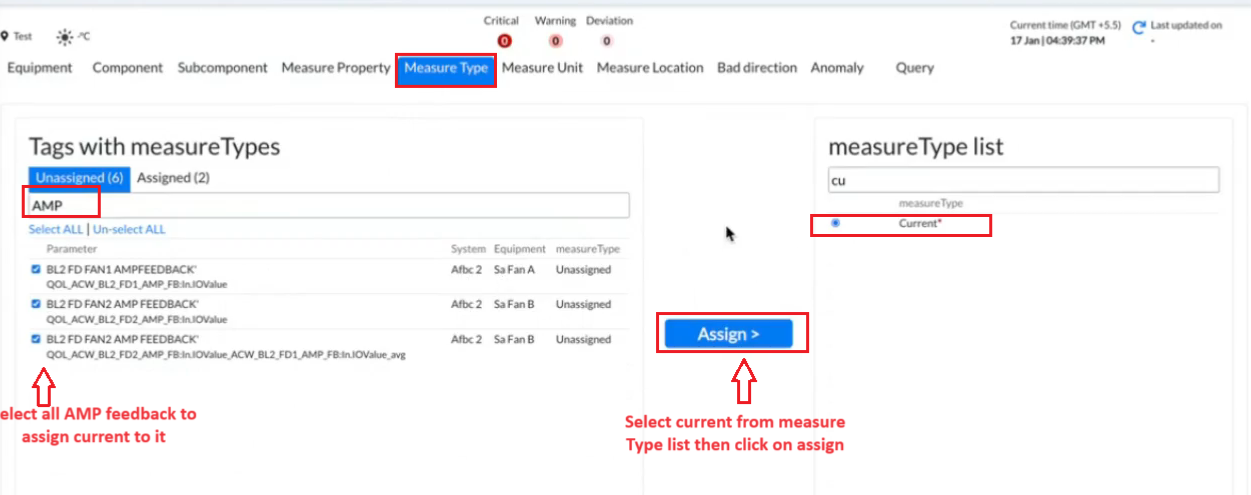
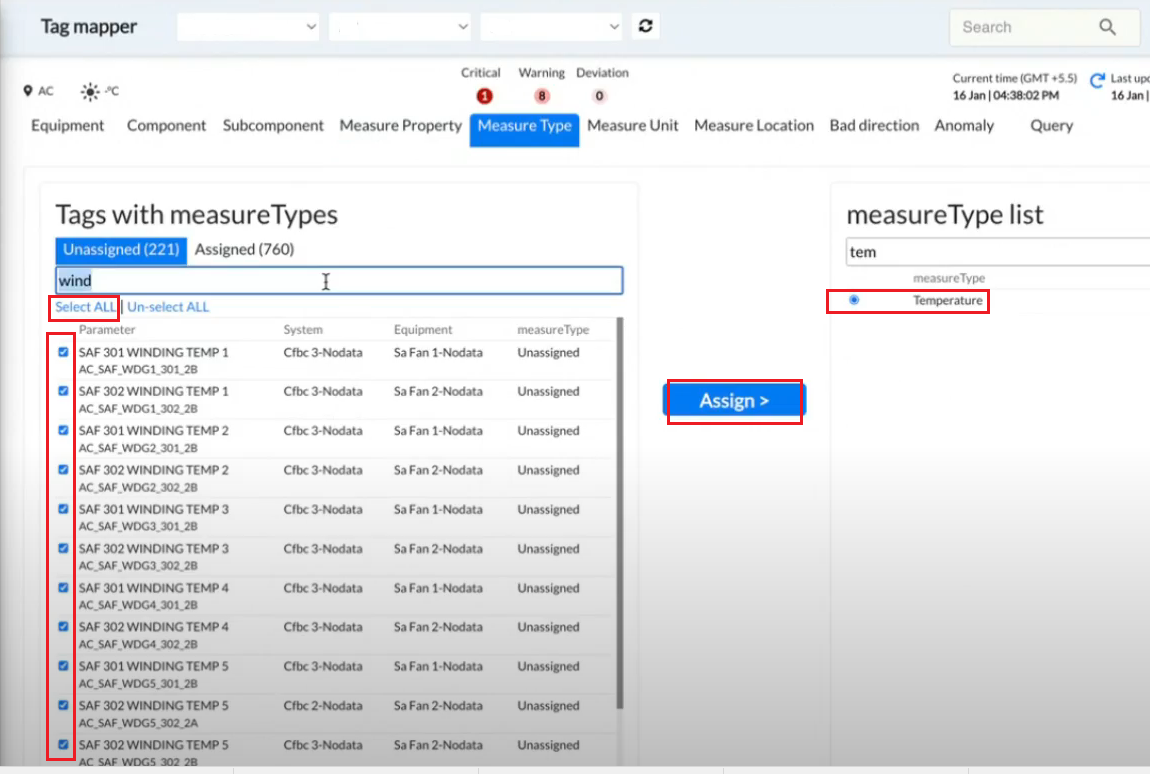
¶ 4.4 How to add Measure type to tags
Measure type- how you measure sensors like amp (current) for a fan.
To assign a Measure Type to tags, follow similar steps as mentioned for equipment assignment.
For example
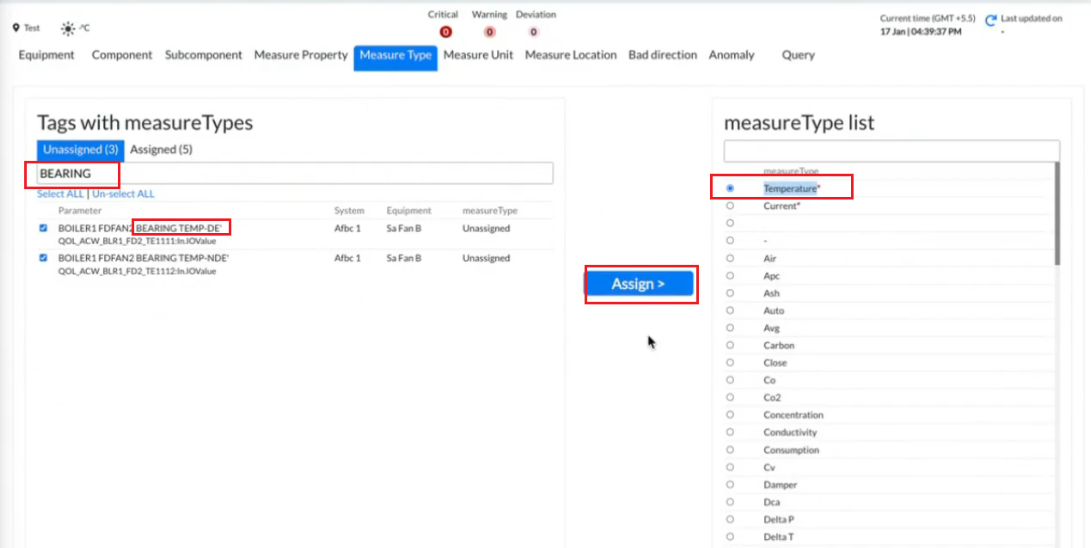
Bearing TEMP-DE -
- Type bearing in Tags with measure Types. You get a list of options with bearing temperature.
- On the right side under measureType List you get an option of “temperature” which is how it's measured.
- Select temperature
- Click on Assign
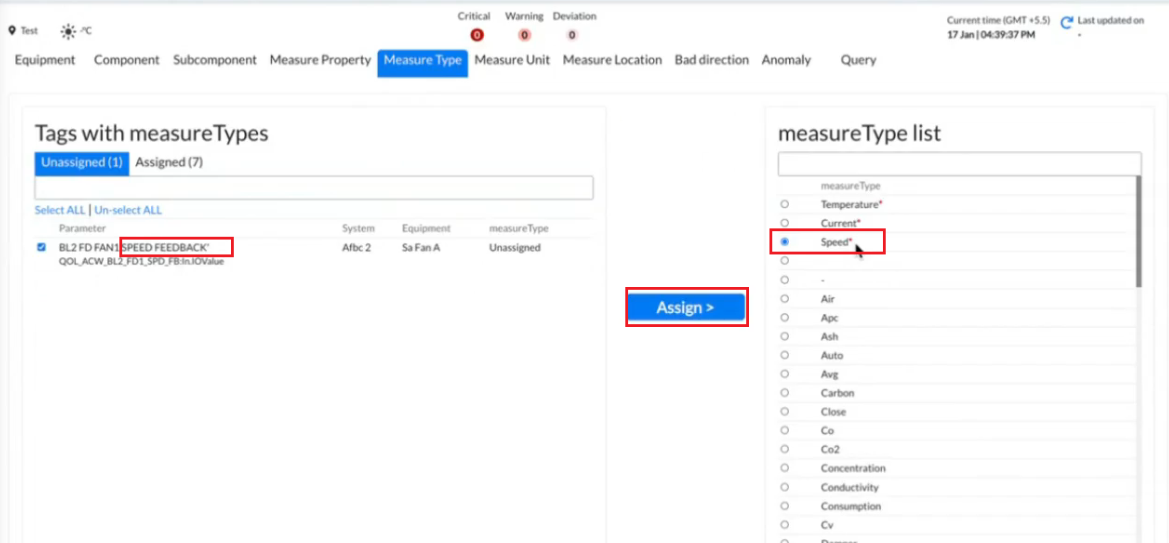
Example3.
FD FAN Speed Feedback- In this you get measure type “Speed” which can be assigned to this tag.
In this way you assign measure property for all the list of tags.
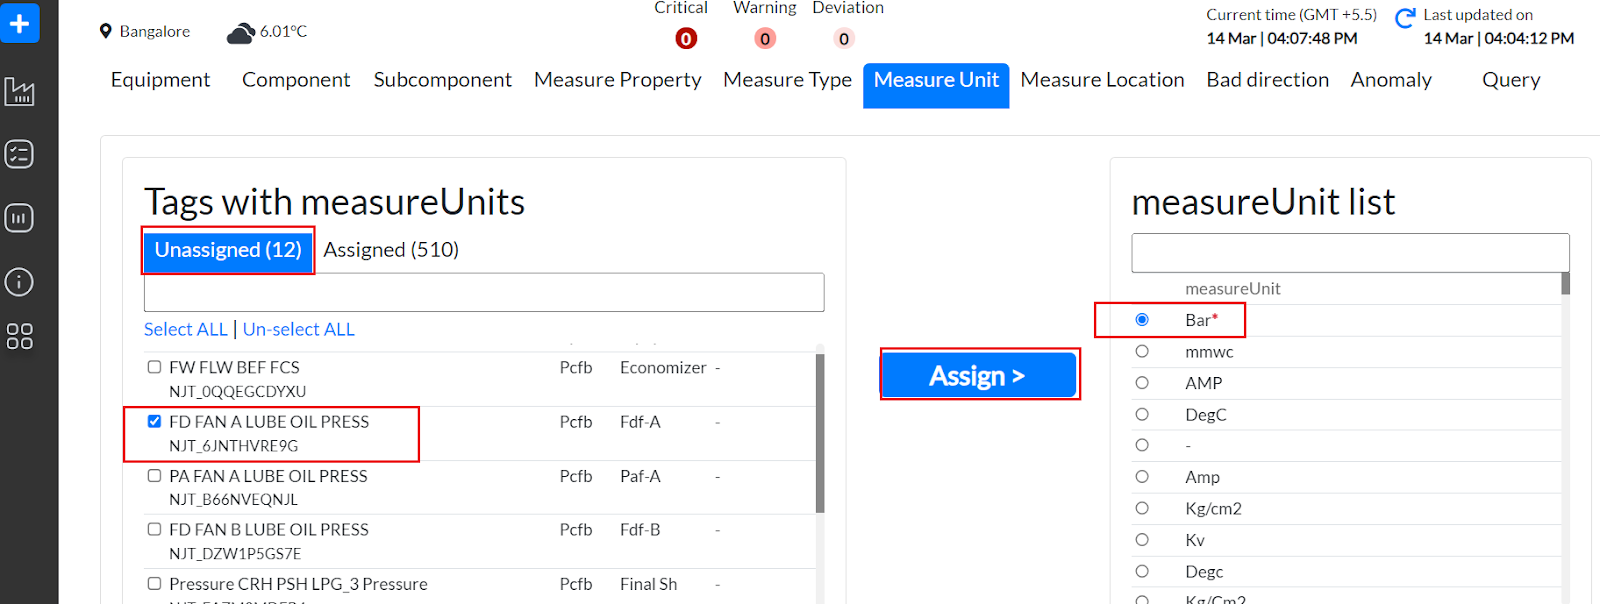
¶ 4.4 How to add measure unit to tags
To add a Measure Unit to Tag
- Click on the “Equipment” button in Tag Mapper
- Click on the “Unassigned” button to check unassigned tags and the “Assigned” button to check assigned tags
- Search for the tag you want to add Equipment to eg. FD Fan A Lube Oil Press
- On the right-hand side search for Equipment under the “Equipment” section search field with respect to the tag.
- Upon selecting a tag on the left side, within a few seconds, the most suitable option for the Equipment that can be assigned to that tag will be automatically highlighted on the right side. This preferred option will be displayed in red color *, providing a clear indication of the recommended Equipment.
- Select one/more tags on left side while select Equipment on right side
- Click on “Assign” button
- A message will be displayed “Updating 1 of 1 tags” depending on the number of tags you assign to that Measure Unit.
- The number of unassigned tags will decrease precisely by the number of tags you have assigned a Measure Unit to. Simultaneously, the number of tags under the "Assigned" section will increase by the exact number of tags you have assigned a Measure Unit. This ensures a balanced adjustment in the tag distribution, reflecting the accurate assignment of Measure Unit to the corresponding tags.
¶ 4.5 How to add measure location to tags
Do we need to explain the same steps again?
Steps to add Measure Location to Tag
- Click on the Measure Location button in Tag Mapper
- Click on “Unassigned” to check unassigned tags and “Assigned” to check assigned tags
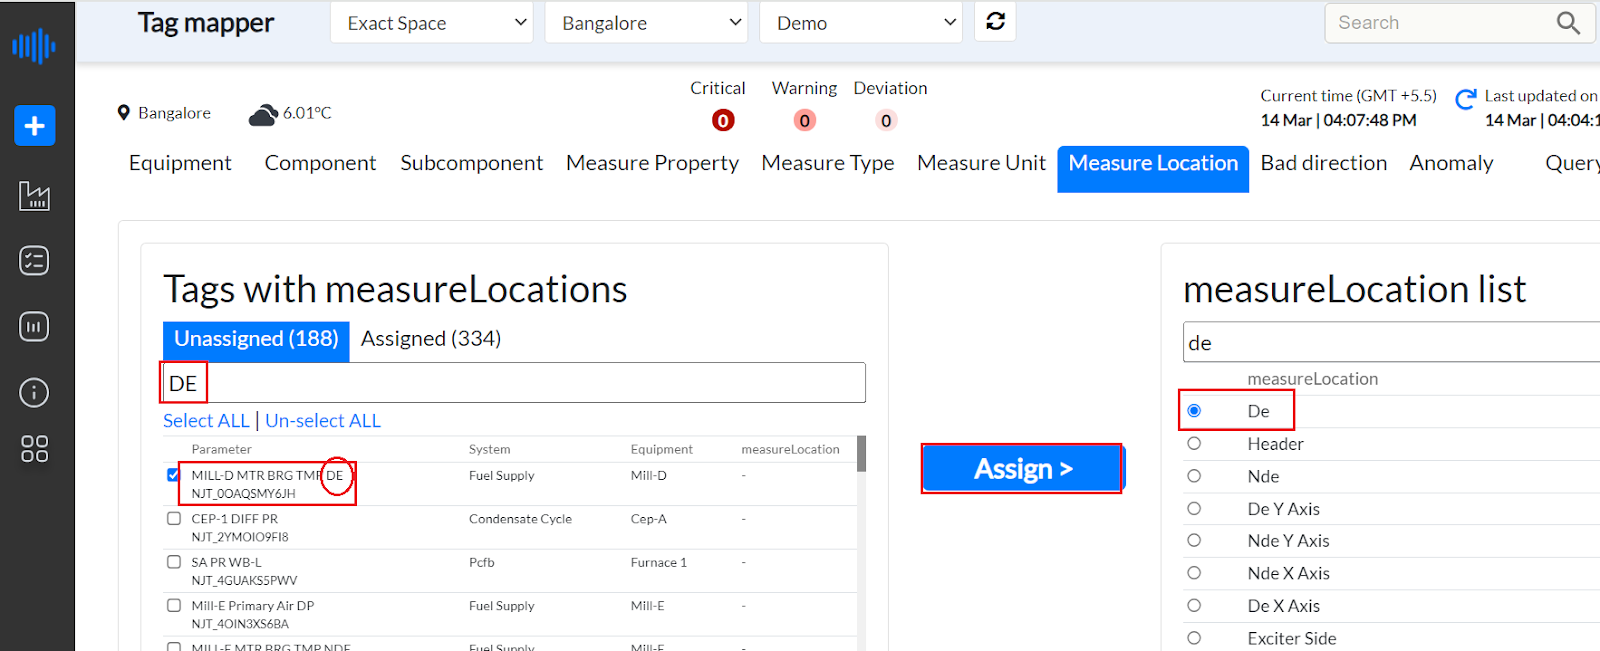
- Search for the tag you want to add a Measure Location on the left side eg. DE
- On the right-hand side search for Measure Location under the “measure Location list” section search field for the tag.
- A recommended option of DE is available or you can search DE under the measureLocation list for selection of the corresponding tag. Refer figure below
- Upon selecting a tag on the left side, within a few seconds, the most suitable option for the Measure Location that can be assigned to that tag will be automatically highlighted on the right side. This preferred option will be displayed in red color *, providing a clear indication of the recommended MeasureLocation
- Select one/more tags on left side while select Measure Location on right side
- Click on “Assign”
- A message will be displayed “Updating 1 of 1 tags” depending on the number of tags you assign to that Measure Location.
- The number of unassigned tags will decrease precisely by the number of tags you have assigned a Measure Location to. Simultaneously, the number of tags under the "Assigned" section will increase by the exact number of tags you have assigned a Measure Location. This ensures a balanced adjustment in the tag distribution, reflecting the accurate assignment of Measure Location to the corresponding tags.
¶ 4.6 How to set Bad Direction
The system is configured to facilitate issue identification. For instance, consider "Bearing temperature." In temperature-related scenarios, high temperatures often trigger issues, while low temperatures are typically acceptable. Given that issues arise primarily at the high end, assign the "high" designation to a set of temperature tags accordingly.
Example “Current B phase” will raise an issue if its current value goes “high”. Refer figure below
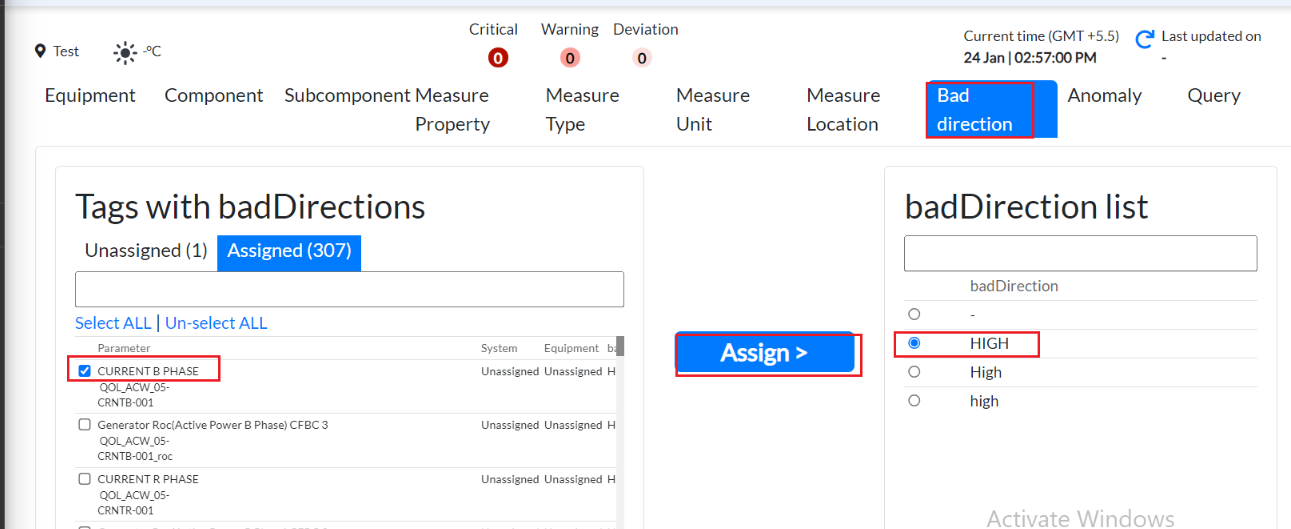
Note: If you assign “-” here for any tag, this means you want alarms for both sides high as well as low.
¶ 4.7 Anomaly
If you set an anomaly to “True”, you need an alert for that tag. Towards which side (Low or high or both) you want that anomaly to be raised is decided by a bad direction.
In case you do not want an anomaly to be raised for a particular tag, set the anomaly value to “False” for that tag.

This feature is primarily intended for creating alarms and is not directly related to metadata. Therefore, all tags are displayed as assigned, as it's crucial for all tags to trigger alarms in the event of value changes beyond specified limits. “Unassign” tags which cannot raise an anomaly i.e. if a particular tag is not needed in fault tree or to raise a concern, assign that tag as “false” in anomaly, then alarm will not be triggered from there.